You are using an out of date browser. It may not display this or other websites correctly.
You should upgrade or use an alternative browser.
You should upgrade or use an alternative browser.
Under tray removal
- Thread starter Fez
- Start date
Tel
New member
Fez said:Evening all, how easy is it to remove the engine under tray. Any thing to beware of? It is only so I can give the underside a good clean. Cheers Phil
It's a doddle to remove....maybe a bit overkill for cleaning, but if you have a lift and the time, why not.
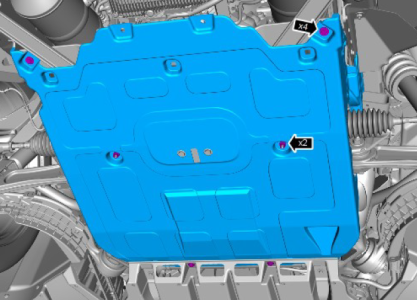
Here's a diagram to help:
Attachments
Tel
New member
Fez said:Thank you Tel, I think it just having the confidence, I have lift to get half a metre off floor. I building up to taking the wheels off and inner arch protection off so I can clean and protect before putting it all back.
You're welcome.
Perfect. Removing the wheel-arch liners is such a worthwhile exercise.
I use a diluted 50/50 mix, filtered and desalinated water mixture and Autoglym Trade SUPERSHEEN...it's so good on plastic/trim.
Apart from general corrosion and guarding the metal, pay particular attention to the small junction box on the drivers side behind the brake caliper:

There is a small plastic low profile moulding a couple of inches long, that is an Achilles heel.
Look at the above pic above the x2 arrow (but in reverse as this pic shows the passenger side) and you'll see it bolted to the bodywork.
Flip the lid and underneath you will find a large stud and several heavy duty bolted connections. The leads feeding this come from the battery and they then connect to leads that pass on towards the jump start point.
Dissimilar metals, plus 12V, plus road water cause this to be a major issue with corrosion.
This not only results in structural weakness/integrity of the connections, but more importantly, really plays havoc with the electronics of the car.
A
Anonymous
Guest
Tel said:Fez said:Thank you Tel, I think it just having the confidence, I have lift to get half a metre off floor. I building up to taking the wheels off and inner arch protection off so I can clean and protect before putting it all back.
You're welcome.
Perfect. Removing the wheel-arch liners is such a worthwhile exercise.
I use a diluted 50/50 mix, filtered and desalinated water mixture and Autoglym Trade SUPERSHEEN...it's so good on plastic/trim.
Apart from general corrosion and guarding the metal, pay particular attention to the small junction box on the drivers side behind the brake caliper:
Screen Shot 2020-04-17 at 20.24.06.png
There is a small plastic low profile moulding a couple of inches long, that is an Achilles heel.
Look at the above pic above the x2 arrow (but in reverse as this pic shows the passenger side) and you'll see it bolted to the bodywork.
Flip the lid and underneath you will find a large stud and several heavy duty bolted connections. The leads feeding this come from the battery and they then connect to leads that pass on towards the jump start point.
Dissimilar metals, plus 12V, plus road water cause this to be a major issue with corrosion.
This not only results in structural weakness/integrity of the connections, but more importantly, really plays havoc with the electronics of the car.
Hi Tel, I’ve taken the wheel off and the cover from the junction box, will it be good enough to just spray some anti-corrosion wax (Dynax UB) onto the stud shown in the photo below? Appreciate any help, this is a keeper!

Tel
New member
Glad you found it.... I wondered if my description was readable!
Anyway, you're on the money. Clean any debris out with a 1" (bristles cut down so it's a bit stiffer) paintbrush and then smother it.
Bilt Hamber is a bit soft as is are automotive protectants.
If you want to really do the business, a marine wax coating is the business.
I've used Corrosion Guard by Quicksilver for about 25 years on all my vehicles and anything with exposed ally...Recommended.
Its expensive, but you pay your price and all that.
A
Anonymous
Guest
Thanks Tel, I’ll use the BH stuff I have now and then re-coat it with better stuff once the lockdown is lifted sufficiently.
A
Anonymous
Guest
Fez said:Great picture, do you have to take out all of the inner wheel arch liner to get to it. It's a job on my list.. regards phil
No, just took the wheel off. The cover has 3 clips that released easily with a flathead screwdriver
A
Anonymous
Guest
Here’s a pic with cover in place.

Tel
New member
Nick said:At least you have a connection easily accessible, on mine it’s hidden up in the engine bay, behind the wheel arch, pig to get at.
Nick, unless your F-Type is unique, you should have exactly the same connection in exactly the same place as mine and everyone else's if its a V8R.
I can shine a torch through the Blade alloy wheel and see the Junction box clearly. It's just fwd of the lower part of the suspension strut, driver side if its rhd.


A
Anonymous
Guest
Nick said:Not there, Wonder if it anything to do with having CC brakes?
Top is yours? bottom is mine
91389A4C-2F9E-4610-AA95-6D4151C1AD2E.jpeg
EAAB0D05-7340-4CF2-AEDC-E3D9BF3E0954.jpeg
Just for clarity, the top picture is of my car, a MY20 P380.
On the bottom picture you seem to be missing some trim securing fasteners too?
Tel
New member
Only explanation is after the heavy front end damage, they cut and shut a new front end on and left a few bits off 
I'll hunt through the w/s manual for CC Brake cars...
Could it be because of the potential heat radiation from CCB's, its relocated to the engine bay as you mentioned in an earlier post Nick?
Can you follow the wire fore/aft and photo the junction box please, wherever it may be?
I'll hunt through the w/s manual for CC Brake cars...
Could it be because of the potential heat radiation from CCB's, its relocated to the engine bay as you mentioned in an earlier post Nick?
Can you follow the wire fore/aft and photo the junction box please, wherever it may be?