I did this speaker upgrade this weekend - this thread was super useful. I'm not experienced doing this kind of work so here's a write up/summary with a few things I found helpful along the way, if anyone else is considering doing it:
Car & Why: Did it on my 2014 F-Type V6S with Merdian sound system. Driver's side bass was sounding wierd and distorted, so was exploring replacements. It's £1k+ at Jag dealer, and you'd just get the same basic speakers that the F-Types come with again. £2-3k+ (and then some) to do somewhere professional like Cambridge Audio. Wanted to spend less, upgrade the audio, and give the replacement a go myself.
Difficulty: Apart from some very basic maintenance and battery swaps I've not done work like this on this or any other car before, so was a bit daunted. Honestly though it was enjoyable and I'd recommend anyone giving it shot. Just need to have the right tools and parts and it'll take maybe 2-3 hours (second door will be faster once you've experienced the first).
Parts: Highly recommend using the plug-and-play upgraded speakers made for the Jaguar XJ, unless you're experienced with these things. Significant upgrade but no custom moulding/electronics work required.
I used Britcar to order the parts new. All in cost about £600. So not cheap, but I wanted a brand new set. You could save a fair bit by buying sets/individually from eBay, though I guess it's a gamble as to how used they are. If you want to buy new, here are the part numbers:
Tweeter: Britcar Part No. C2D30486
Mid: Britcar Part No. C2D2076
Bass: Britcar Part No. C2D24861
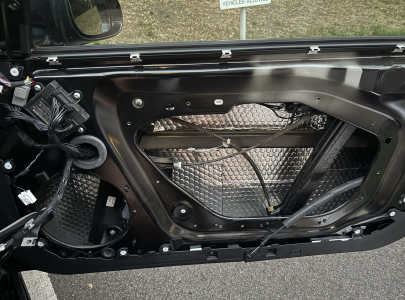
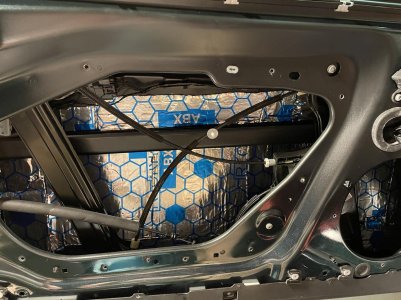
As most other posters have mentioned, you'll want to install sound deadening whilst you're at it. I used Dodo Mat DEADN Hex from
www.deadening.co.uk. I had 12 sheets which was
just enough. 10 sheets per side would be more comfortable.
You might want to buy some replacement door clips, just in case. Can buy them on Amazon super-cheap. I didn't break any on either side during multiple door card removals, but up to you.
Tools: Need a torx screwdriver set (mine was £8 Stanley set from Halfords), car trim remover set (mine was about £6 from Amazon), and some scissors for cutting the sound deadening to shape. If you're also disconnecting the battery first, which is sensible, you'll need something to take the connector bolts out easily: a hand ratchet and socket set with extenders makes life easy. I got mine from B&Q for less than £20. Lastly if you're disconnecting the battery it's not a bad idea to have a battery booster on hand (gotta love the F-Type battery being in the boot...which can only be opened with power!)
Youtube Video: I watched Phils Cars YouTube video entitled "I upgrade my F Type Speakers!!" which was super helpful.
Progress:

Trim panels off, torx screws out, and door card off. Door card for the first time was a bit daunting...top tip: gently lever some space and spot where the clips are, then put the trim tool close to one and apply pressure into the door (better than away from the door so as not to bend door card, and spreads pressure to pop door clips easier). I recommend starting top right above the door latch and working down. Once you've popped the first couple you get the hang of it. As per video unclip door handle release and door power.
Tip: take note of how the door handle release works. The video doesn't show it. It's clipped in two places: the top of the wire and the chunkier black plastic part. You'll need to re-attach it later. All very easy but take note...I didn't first time and the inner door handle didn't work. Ha. An easy fix but do it right first time and avoid re-taking the door card off like I had to...

Take the inner panel off with torx.

Get soundproofing! Good fun.

Reattach panel (thread door release and white cable back through) and keep on soundproofing. This is where I began to run out of soundproofing - I thought the inner was more important so prioritised there. As long as you leave space for door clips etc. you can probably add as much as you like.

Speakers old (bottom) vs. new (top)

Swapping out the new mids with cool kevlar cones

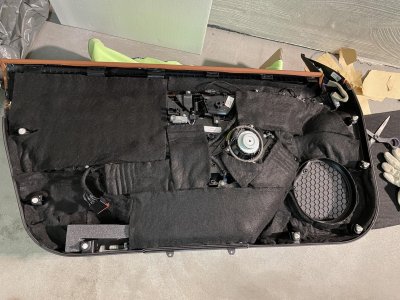
Inner and outer soundproofing done, and all new speakers installed. Ready for reassembly!
I found it pretty easy to do everything in reverse - door cards are pleasingly simple to slot back on. Make sure to 'seat' the door handle release properly as noted above. Slide the black tip of the wire inside the silver holding (easy), and also make sure you clip the chunky black plastic circular piece in to the door card holder.
Good fun and a big sound upgrade so definitely recommend if you're deliberating on giving it a shot yourself.


