Hi Everyone

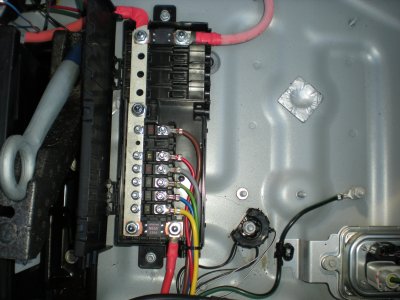
Installed my CTEK Charging Panel in the boot, a little help from RPSN on trim access which was very useful.

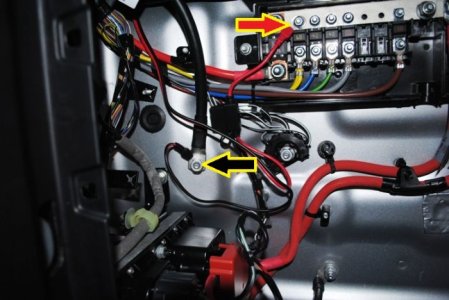
Quite an easy job once you brave removing some clips, on the 2.0 MY19, it has handy places to connect to the Bus Bar, and Negative. Managed to hide the safety fuse in the pre-fuse box too.

Few pics for reference. Car now charging nicely.

DSC03834.JPG
DSC03833.JPG
DSC03832.JPG
DSC03831.JPG
 
Cheers.

The CTEK MXS 5.0 is a great piece of kit.

Looking at your power distribution block, there are fewer connections in it than mine. This must be due to different F-Type models?

The CTEK positive connection that you have made on the bus-bar of the power distribution block is probably ok but the TOPIx Jaguar instructions show that it should be connected on the bus-bar 09 connection, opposite the yellow wire. Also the TOPIx instructions show that the CTEK negative lead is connected to the battery negative post which is on the bodywork (see photo).

Here's a link on how to install the CTEK MXS 5.0 battery charger & conditioner (including step by step photos).

I have also included a link for the TOPIx Jaguar instructions.

https://howtune.com/articles/548-install-the-battery-charger-on-a-2016-jaguar-f-type

https://topix.jaguar.jlrext.com/topix/content/document/view?id=530389&parameters=highlight%3Dbattery%20charging
 

Attachments

  • CTEK MXS 5.0 wiring connections.jpg
    CTEK MXS 5.0 wiring connections.jpg
    59.1 KB · Views: 5,127
RPSN said:
Looking at your power distribution block, there are fewer connections in it than mine. This must be due to different F-Type models?

Possibly different model years - my MY18 V8 AWD is as sparsely populated as Philskill's.
 
It could be?

This is a photo of my own vehicle's power distribution block before I made the CTEK connections.

It may be that some of the connections inside it are for the optional extras i.e.

Seat Memory Pack 2 (14x14 way)
Powered Tailgate (open & close)
Reverse Park Camera with Guidance
Front Parking Aid?
 

Attachments

  • DSCN5373.JPG
    DSCN5373.JPG
    1.2 MB · Views: 5,108
Thanks RPSN, always useful to see recommended installations, I might move the negative so it's directly on the cable to the battery terminal, I almost put it there anyway but it was not quite as neat an installation, the Positive with the size of that busbar will make no odds and it's probably to allow the fuse to sit outside of the box and not interfere with the cover.

There's certainly a lot more connections made in that box!
 
For the options definitely think 1 will be the powered tailgate, I dont have this and it will work when the car is off.
 
Philskill said:
Thanks RPSN, always useful to see recommended installations, I might move the negative so it's directly on the cable to the battery terminal, I almost put it there anyway but it was not quite as neat an installation, the Positive with the size of that busbar will make no odds and it's probably to allow the fuse to sit outside of the box and not interfere with the cover.

There's certainly a lot more connections made in that box!

If you do move the CTEK negative lead onto the negative battery lead (attached to the bodywork) you’ll probably see a bit of sparking going on and several clicks may be heard to the electrical system. You may find that after doing this, the instrument panel inside the car has a horizontal line showing on the blank display. If it does, just go into vehicle display settings and adjust accordingly i.e. logo, audio etc. I have mine set on logo (i.e. Jaguar logo).

The positive connection you have made on the bus-bar will be fine as it’s still on the correct side of those mega fuses at each end of the bus-bar.

I would have been inclined to route the CTEK fuse holder outside of the power distribution block as it’s further away from the yellow wire etc and you won’t see it when the trim is replaced ;)
 
Gave mine a wash today, the first wash since I put gTechniq Crystal Serum Light and Exo on the paintwork, and also G1 on the glass, thought I would capture a quick video of how the coatings perform.

[media]https://youtu.be/xDUKJKrtfG8[/media]
 
So as it's tucked away thought i'd have a look at cleaning/treating the calipers.

First thing I found was my High reach trolley jack for the Evoque does not go under the front, any recommendations on a low trolley jack.

so had the rear wheel off instead, surprised how much corrosion there was on the rear caliper.

RearCaliperBefore1.JPG

RearCaliperBefore2.JPG


Gave it a light clean up with my dremel and a coat of dark silver high temp paint just to protect it a little in the future.

RearCaliperAfter.JPG

RearBrakeAfter.JPG


Gave the wheel a good clean and a ceramic coat inside while it was off too.

WheelInner.JPG
 
Philskill said:
First thing I found was my High reach trolley jack for the Evoque does not go under the front, any recommendations on a low trolley jack.


Before jacking my car up I drive it onto solid wooden ramps. This gives an extra 70mm ground clearance and the trolley jack easily fits underneath the jacking points.

I acquired two unwanted blocks of wood and had them cut to size at my local woodworking shop for £5 (see photos inc dimensions).

You could even use a small section of scaffolding plank with a 45 degree slope cut into the end of it. That would probably be sufficient to raise your car enough to get the jack underneath (scaffolding plank has a thickness of approx 38mm).
 

Attachments

  • 4.jpg
    4.jpg
    2.7 MB · Views: 4,389
  • 3.JPG
    3.JPG
    1.2 MB · Views: 4,389
  • 2.JPG
    2.JPG
    1.4 MB · Views: 4,389
  • 1.JPG
    1.JPG
    1.2 MB · Views: 4,389
Thanks RPSN did look around for some wood in the garage, but didnt have anything suitable, may make something up, or did see a low reach trolley Jack in Halfords for £50. Trouble is Jack's arent the easiest things to store.
 
Philskill said:
Thanks RPSN did look around for some wood in the garage, but didnt have anything suitable, may make something up


Easy enough to do and will save buying a new trolley jack.

Nice set-up you have there and a good job done on the gTechniq Coatings and rear calipers 👍
 
Thanks, Yes I went a bit OTT on the garage, but it was the reason I was persuaded to move! ;)

Really worthwhile though, I love it now!

I met Rob and team from gTechniq, on one of their open days, really impressed with their products and ethos

Cupboards.jpg
 
Awesome garage and It's even got one of my initials on the floor!..........I think it's time for me to move ;)

The gTechniq products you use look really good. I use Autoglym Rapid Aqua Wax and I find this also gives the car a good shine and it beads water (off a duck's back) for ages.
 
Thanks guys, believe it or not I did look at a 2 post... but thought it was a bit too much! but never say never.
 
I used gTechniq Crystal Seum Light in the panels that I corrected, (left rear and Roof) then the whole car got Exo.

I have a new tub of Aqua Wax, came with the lifeshine that the dealer put on , and I had to remove on the panels they didn't do a great job of.

Had I known lockdown was coming would have done the whole thing...
 
Back
Top