Dashcam fuse tap query

David-93

New member
Hi all,
I'm looking to install a front&rear dashcam (awaiting delivery) in my MY20 coupe, I've had a bit of a search around the forum and other sites, however I can see it mentions that the fuse boxes have changed over time but mostly talks about the fuse box in the passenger footwell (under your mat/feet) which seems to have changed a couple times from MY18/9(?) and prior.

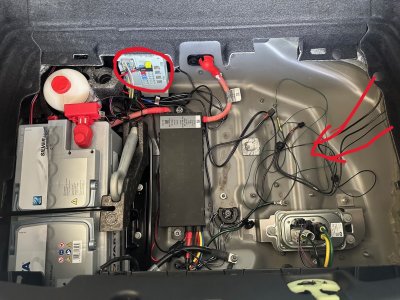
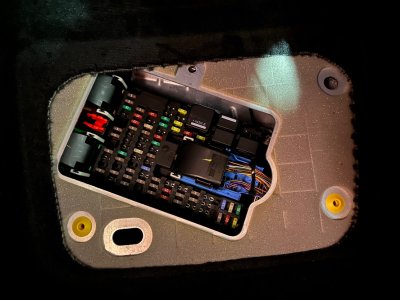
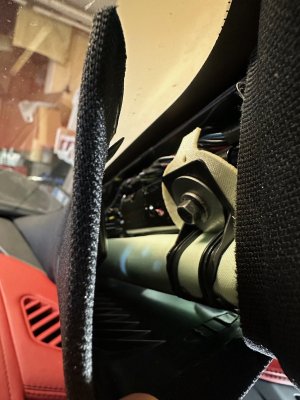
Unfortunately this fusebox in a MY20 doesnt have fuses accessible and seems to have just big plastic cable connectors direct to the board instead, so I have to look at the awkwardly placed fusebox in the leftside of the passenger compartment.

For this passenger compartment fusebox, I seem to find reference to people mentioning to use the "Centre console accessory socket" (F25) or the "cubby box accessory socket" (F26) for ACC/Ignition Switched live. So that sorts that cable of the 2 out.
However I can't seem to find any reference to what people are using for the Battery/Constant live connection?
Below is an excerp direct from Jaguars owner manual for my VIN.
JagOwnersManualMY20PassengerFuseBox.png

I've had fun laying on my back and side going through with a tester to identify what has a battery/constant live and just wondered if anyone else has any advice first?
I'm obviously trying to avoid main systems but it seems like F2 "Singapore road pricing" and F6 which is empty, both have a battery/constant live. There shouldnt be any issue using either of these would there, unless anyone has a better suggestion from experience?

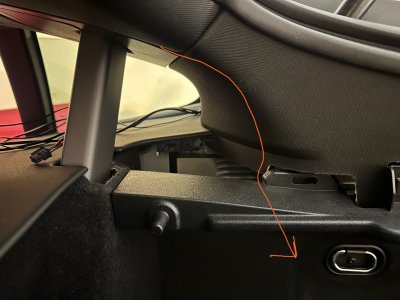
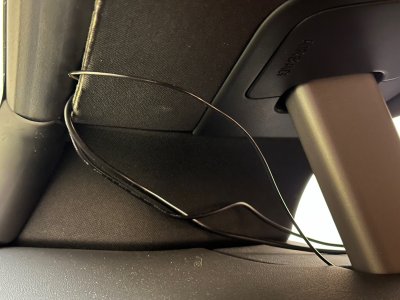
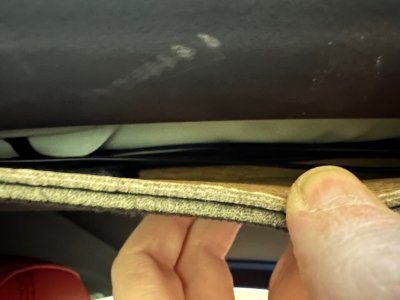
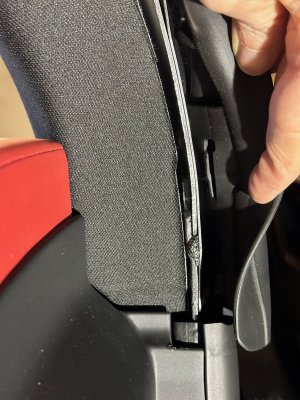
Finally re: curtain airbags and the rear camera cable run.
I'm presuming the best way to run the cable will be via the bottom of the door due to the curtain airbag across the top and then up to the 3/4 window around the bottom of the Airbag plastic before going into the headlining edge to the middle of the back headlining.

Thanks for any assistance.
 
I used fuse 25 as the switched live,
And then fuse 13 as the permanent,

I picked these purely cause they seemed the easiest to fit the fuse taps the correct way round.

I ran my cabling along the headlining and Down the pillar keeping it behind the airbag,

I didn’t fit the rear camera so can’t help there,

Be careful undoing the pillar torque screw, if you use a ratchet, mind the ratchet handle on the wndscreen
 
S1jor said:
I used fuse 25 as the switched live,
And then fuse 13 as the permanent,

I picked these purely cause they seemed the easiest to fit the fuse taps the correct way round.

I ran my cabling along the headlining and Down the pillar keeping it behind the airbag,

I didn’t fit the rear camera so can’t help there,

Be careful undoing the pillar torque screw, if you use a ratchet, mind the ratchet handle on the wndscreen

Thanks. I thought previously it would be better to avoid Fuse 13 being DSC amongst other things.
Also thanks for the comment about the ratchet handle.

Wish I knew why and what the Singapore Road Pricing, fuse 2 was for exactly. As from what I've seen its a small little device thats installed on the windscreen by their government and does there Road tax essentially, it's supposedly not a Jaguar system, so seems weird we have it mentioned specifically in our owners manual for UK cars. Thought Singapore would end up just ad-hoc installing it with a fuse tap etc.
 
David-93 said:
Wish I knew why and what the Singapore Road Pricing, fuse 2 was for exactly. As from what I've seen its a small little device thats installed on the windscreen by their government and does there Road tax essentially, it's supposedly not a Jaguar system, so seems weird we have it mentioned specifically in our owners manual for UK cars. Thought Singapore would end up just ad-hoc installing it with a fuse tap etc.

Possibly has to be factory fitted before the car can be imported?
 
Is fuse location 6 and 2 definitely permantly live??
Looking at the diagram I was following fuse 2 is empty.

If there permanently live I may move mine from fuse 13 to either of them,

As you say keep the fuse tap away from important systems
 
Hi David.

This might not be what you are after but it could be of help.
I went completely overboard with my setup and wanted to protect my cars own electrical systems from any parasite drawn. (While in parking mode)
Installed a Thinkware U3000 + Bab-95 battery with the hardwire kit.
It´s designed to pull the power (Feeding the dashcam and also charging it´s own battery) directly from the vehicle when the ignition is on and when you shut it down it´s powered by the separate dashcam battery while in parking mode.
So far i am really impressed with it, it tells me the amount of charge when starting and exiting the vehicle. (When pulling the most amount of power while recording it can do 33 hours on it´s own)
It also tells me about any recordings (this camera can use radar instead of motion) it´s done while away and what type and the amount.
Now to the fun part.
The battery weights more than you think and i didn't want to have it in the glovebox.
So decided to place it in the boot by hardwire it to the rear fusebox (that´s always live), then i ran the cables on the right side to the dashcam.
The dashcam itself also have a separate cable that goes down the A-pillar and behind the glove box and to the passanger fotwell fuse box for the switched live fuse. (Same F25 - Centre console accessory socket, but be aware that this one goes live as soon as you unlock the car and not by the ignition)
I was able to (but it´s impossible to show with pictures) put the wires on the inside of the airbags.
The side of the roof (under the rubber seal) is very soft so it was easy to slide it in there and then gently with your finger make sure it´s on the inside top of the curtain. (On my picture i have yet to slide it up/behind)
I´v attached some pictures that might help you along the way.
If you have any questions feel free to ask and i try and answer.

I´v done a few dashcam installations in the past but hand on heart have to say that the F-type is so far the easiest one since most material and panels are soft and easy to remove once you know where the clips are. (Plastic tools is a must to protect the interior)
Good luck.
 

Attachments

  • Battery fixed in place.jpg
    Battery fixed in place.jpg
    810.6 KB · Views: 6,112
  • Hardwired power, test before final.jpg
    Hardwired power, test before final.jpg
    570.8 KB · Views: 6,112
  • Cables down to the boot.jpg
    Cables down to the boot.jpg
    464.7 KB · Views: 6,112
  • Cables towards the rear.jpg
    Cables towards the rear.jpg
    544.9 KB · Views: 6,112
  • Cables before they are pushed up behind curtain.jpg
    Cables before they are pushed up behind curtain.jpg
    635.6 KB · Views: 6,112
  • Side curtain.jpg
    Side curtain.jpg
    462.1 KB · Views: 6,112
  • A pillar right side at dashboard.jpg
    A pillar right side at dashboard.jpg
    745.8 KB · Views: 6,112
  • Passenger fusebox.jpg
    Passenger fusebox.jpg
    469.5 KB · Views: 6,112
  • Behind A pillar.jpg
    Behind A pillar.jpg
    488.9 KB · Views: 6,112
  • A pillar.jpg
    A pillar.jpg
    373.7 KB · Views: 6,112
S1jor said:
Is fuse location 6 and 2 definitely permantly live??
Looking at the diagram I was following fuse 2 is empty.

If there permanently live I may move mine from fuse 13 to either of them,

As you say keep the fuse tap away from important systems

Sorry for the delay.
So in the end I went with F25 "Centre console accessory socket" for ACC, like how most people do, as I'll unlikely use the centre console cigarette lighter socket.
For battery/constant live I went with F2 "Singapore Road Pricing".

So to ensure that this can assist anyone with a MY2019/20+ in the future with only the passenger compartment fuse box and not the one under the passenger carpet like prior years, below is a photo of the current setup. Hopefully it'll be of help in the future, especially considering the photo assistance of the curtain airbags from Chris - SWE which I havent seen on any other threads.
FuseBox.jpg
Chris - SWE, although irritatingly I had run the cable for the rear camera hours before your post, the additional photos around the curtain airbags will make it easier for me as I just put it in the rubber seal as I didn't pull the headlining back enough to see the airbag, I'll get it rerouted now from those pics. Thanks again.

Camera that was fitted was a U3000 Thinkware with front and rear cameras, both with radar. Additionally the rear camera is fitted via one of these adapters on the head lining. https://www.dashcams.co.uk/product-page/rear-window-dash-cam-mount-bracket - The website now suggests you to use a DC03, this wasn't stated before I bought the 3 pack and found the DC02 to fit better in my car however it is slightly lower than the headlining than the DC03.
 
Is the blue insulation tape (with the black wire poking out) your doing? Self-amalgamating (and fabric covered) tape is good and looks more 'factory' when doing things
 
Kev said:
Is the blue insulation tape (with the black wire poking out) your doing? Self-amalgamating (and fabric covered) tape is good and looks more 'factory' when doing things
It is not and I stayed away from it. I do not know what someone has done in the past if anything.
Thanks for the heads up with self-amalgamating tape, note for the future for any alterations to other cars etc.
 
Back
Top