RPSN
New member
After having issues with the battery back-up security sounder (BBUS) on my V6 S Coupe (explained towards the end of this post), I’ve now replaced the sounder and have logged how I did it in case I need to refer to it in the future. The job also involved the removal of the UK driver’s side bonnet airbag actuator. I’ve attached plenty of pics (numbered for reference) as they’re a good visual of the procedure, and the remainder of them are in my next post. For those who may have the same fault and prefer to DIY, here's how I did it.....
Before repairing or replacing any Pedestrian Protection System components, take note of the following important information:
To avoid accidental deployment and possible personal injury, the backup power supply must be depleted before repairing or replacing any Pedestrian Protection System components. To deplete the backup power supply, first disconnect the battery ground cable then disconnect the battery positive cable and wait ten minutes. Failure to follow this instruction may result in personal injury.
Do not use a multimeter to probe the Pedestrian Protection System actuators. It is possible for the power from the multimeter battery to trigger the activation of the actuator. Failure to follow this instruction may result in personal injury.
________________________________________
If doing this job when the car is outside in the elements (not garaged etc) try to choose a day when the weather is good. I was lucky considering it was February in the UK.
Open both doors so that the windows automatically drop a little. This ensures the window glass doesn’t catch at the top when opening or closing the doors after the battery has been disconnected.
Open the boot and disconnect the battery negative ground cable then the battery positive cable. I used a pair of rubber flip-flops to insert under the disconnected cable ends to ensure the positive made no contact with the battery terminal and negative made no contact with the boot floor whilst I was doing the job (see 1st pic)
I doubled up an old piece of carpet and placed it between the car boot locking mechanism then rested the tailgate onto it as this ensures it doesn’t fully close (2nd pic). If the boot was fully closed after the the battery is disconnected you would have to connect power to the car via the jump start points under the bonnet in order to open it again.
Very importantly, I waited for just over ten minutes so that the backup power supply was depleted before working on the Pedestrian Protection System components. Failure to do this could result in personal injury.
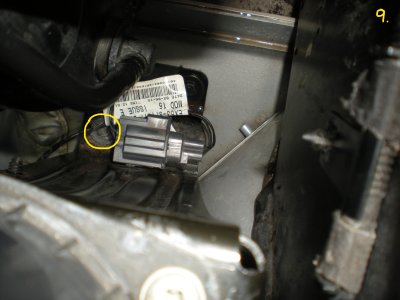
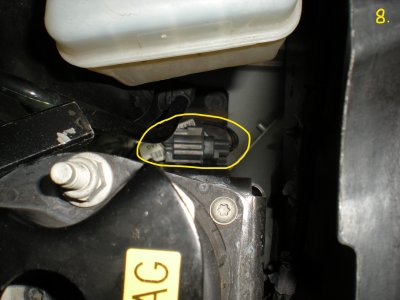
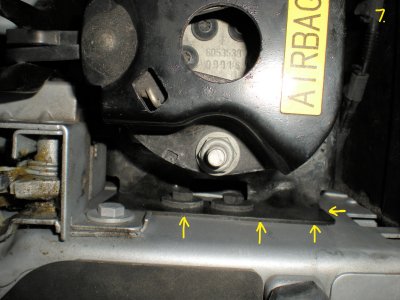
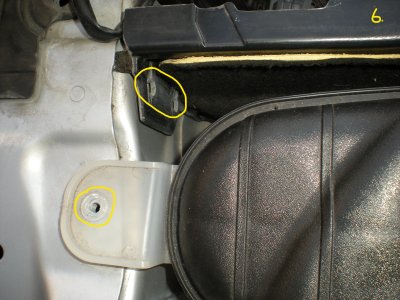
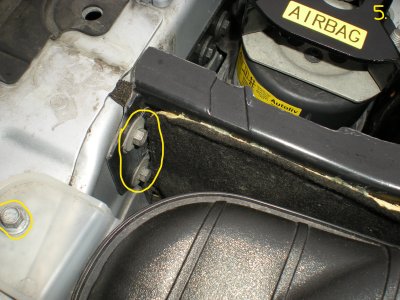
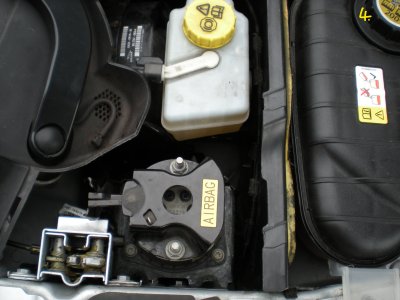
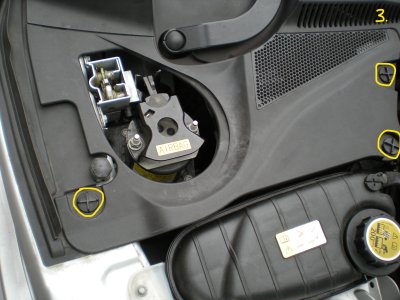
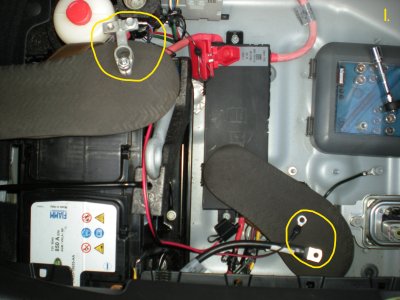
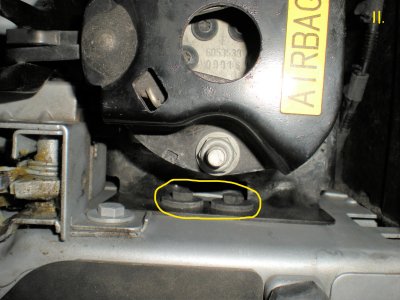
Remove the UK driver’s side plastic windscreen cowl extension cover (3rd & 4th pics). Remove the coolant expansion tank bolt and the two small 8mm bolts on the ‘engine bay sound insulation outer dash panel’ (5th & 6th pics), as the panel can be flexed slightly forward, allowing more room to work on the bonnet airbag actuator. Use a pencil to mark around the top area where the airbag actuator is bolted to the bodywork (7th pic) as this will help when refitting it and should prevent any bonnet closing issues due to misalignment. I used a long steel rod with hooked end to turn the BBUS connector (8th pic) to gain access and remove the actuator stand’s two lower inner bolts (9th & 10th pics) with a 10mm socket and long extension bars, then I removed the two upper bolts (11th pic) with a 10mm open-end spanner.
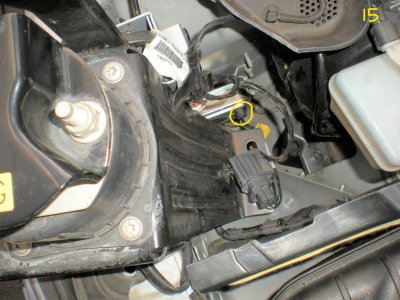
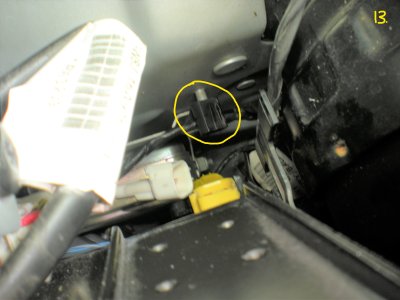
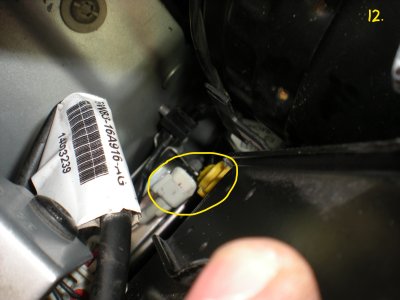
Move the airbag actuator to the right, towards the front of car, this will just about allow you to get your hand in behind and turn then disconnect the white and yellow connectors (12th pic). This is done by pulling up the red locking clips on the connectors and using a small flat-head screwdriver to help release them before unplugging. Pull the small black plastic cable holder (with attached cables) away from the bulkhead stud (13th pic). This can be done by carefully prizing around it with a flat-head screwdriver. Slowly lift out the airbag actuator (manoeuvring it along the way) then seat it on top of the rubber seal which is up above the front fender panel (14th pic). The airbag actuator will still be attached to the car by a few cables which is ok. Look down into the opening and note the position of the BBUS connector plug as the sounder should be refitted the same way. It’s on the right hand side of it (15th pic) and is closest to the centre of the car. Remove the sounder from its bracket (2 x 8mm nuts which only need to be loosened) and lift it up then unplug it by inserting a small flathead screwdriver etc into its retaining clip (16th pic).
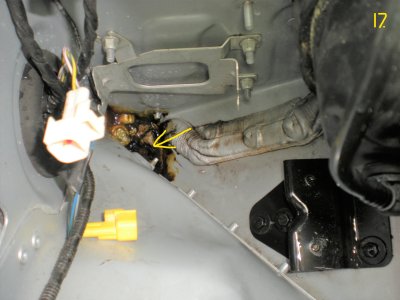
Remove any debris from the bottom of the bulkhead, located below the sounder bracket (17th pic). There was next to nothing in mine although there was some staining there which I couldn’t get rid of (nothing to be concerned about though). Push the connector plugs to one side then carefully pour some water from a small container (e.g. a clean jam jar or coffee mug) into the bottom of the bulkhead (avoid getting water on the connector plugs). This is to check that the water drains away from the car and onto the floor. The drain is a decent size and mine quickly drained the water away.
Look at the threaded positions of the two nuts on the old BBUS (16th pic) then remove them and refit into a similar position on the new sounder (this minimises the amount of turns needed to tighten it up when refitted onto its bracket, as it’s located in a confined space). Fit the connector plug onto the new sounder then position it onto the bulkhead bracket, ensuring the connector is on the right hand side of the sounder, closest to the centre of the car (15th pic). When tightening it, the nut nearest to the corner of the bulkhead is more difficult to access but a small 8mm spanner and a bit of patience will do it. The other nut is easy enough to tighten.
Carefully start lowering the airbag actuator back into position ensuring the cable for the BBUS is routed above the bottom of the actuator stand (9th pic) and not underneath it. On the way down, push the small black cable holder (with attached cables) onto the bulkhead stud (13th pic). Reconnect the yellow then white connectors and push their red locking clips down into place. Line up the actuator with the bolt holes at the top and bottom of it and start threading the two lower bolts on by hand (this is a bit tricky as there isn’t much space but it can be done) otherwise they could easily be cross-threaded, then insert the two bolts into the top of the actuator. Line the actuator up with the pencil marks you made against the top area where it is bolted to the bodywork (7th pic) as this should prevent any bonnet closing issues, then tighten the two upper and two lower bolts.
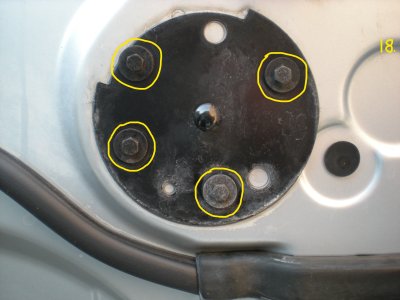
Refit the two small 8mm bolts on the ‘engine bay sound insulation outer dash panel’ then the coolant expansion tank bolt (5th pic). Refit the plastic windscreen cowl extension cover (3rd pic) and remove any tools etc that you have used from under the bonnet, then close it. If the bonnet fails to close properly e.g. one side of it hasn’t latched on, open the bonnet and on the same side slightly loosen the 4 bolts on the ‘bonnet secondary latch striker plate’ (18th pic) so that they are finger tight. Close the bonnet and the striker plate will move accordingly, allowing the bonnet to close properly. Open the bonnet and tighten the 4 bolts on the striker plate then close the bonnet.
Open the car boot and remove whatever you have used to stop the battery positive cable touching the battery terminal (I used a rubber flip-flop). Connect and tighten the battery positive cable, then do the same with the battery negative ground cable. Remove whatever you have used to stop the boot from closing (I used a piece of doubled-up carpet), refit the boot panels and close the boot by hand (it may not fully close until the engine is started).
Reset windows as follows:
Start the engine and close the window fully then release the window switch.
Lift the switch to the close position and hold for 2 seconds.
Repeat this process up to a total of 5 times.
Test the window to check that one-touch operation is working correctly. Repeat the process for the remaining window.
The time & date will need resetting on the touchscreen and the instrument panel display setting (operated from the steering wheel buttons) will need to be reset to your preference....I use the Jaguar logo.
I’ve tested the alarm system and new battery back-up security sounder (BBUS) which also included jacking the car up when it was double locked to check the tilt sensor (this is incorporated into the sounder). All is working perfectly and I’m now getting the single audible beep when double locking, no beeps when unlocking and the alarm is activated when the vehicle is double locked then jacked up. The car was previously giving no beep when double locking, two beeps (error tone) when unlocking, which indicates a fault with one of the security sensors (mine being the BBUS), and no alarm activation after the car was double locked then jacked up. This is explained in my previous topic.....’Alarm malfunction – No audible single beep when double locking’ https://www.ftypeforums.co.uk/viewtopic.php?f=21&t=6030
Plenty of patience is needed when doing the job but it’s very satisfying once completed. The total cost for a new sounder (part number C2D47174) which I purchased from my Jaguar main dealer was £124 and comes with a 2 year warranty. DIY labour charges were free!")
Before repairing or replacing any Pedestrian Protection System components, take note of the following important information:
To avoid accidental deployment and possible personal injury, the backup power supply must be depleted before repairing or replacing any Pedestrian Protection System components. To deplete the backup power supply, first disconnect the battery ground cable then disconnect the battery positive cable and wait ten minutes. Failure to follow this instruction may result in personal injury.
Do not use a multimeter to probe the Pedestrian Protection System actuators. It is possible for the power from the multimeter battery to trigger the activation of the actuator. Failure to follow this instruction may result in personal injury.
________________________________________
If doing this job when the car is outside in the elements (not garaged etc) try to choose a day when the weather is good. I was lucky considering it was February in the UK.
Open both doors so that the windows automatically drop a little. This ensures the window glass doesn’t catch at the top when opening or closing the doors after the battery has been disconnected.
Open the boot and disconnect the battery negative ground cable then the battery positive cable. I used a pair of rubber flip-flops to insert under the disconnected cable ends to ensure the positive made no contact with the battery terminal and negative made no contact with the boot floor whilst I was doing the job (see 1st pic)
I doubled up an old piece of carpet and placed it between the car boot locking mechanism then rested the tailgate onto it as this ensures it doesn’t fully close (2nd pic). If the boot was fully closed after the the battery is disconnected you would have to connect power to the car via the jump start points under the bonnet in order to open it again.
Very importantly, I waited for just over ten minutes so that the backup power supply was depleted before working on the Pedestrian Protection System components. Failure to do this could result in personal injury.
Remove the UK driver’s side plastic windscreen cowl extension cover (3rd & 4th pics). Remove the coolant expansion tank bolt and the two small 8mm bolts on the ‘engine bay sound insulation outer dash panel’ (5th & 6th pics), as the panel can be flexed slightly forward, allowing more room to work on the bonnet airbag actuator. Use a pencil to mark around the top area where the airbag actuator is bolted to the bodywork (7th pic) as this will help when refitting it and should prevent any bonnet closing issues due to misalignment. I used a long steel rod with hooked end to turn the BBUS connector (8th pic) to gain access and remove the actuator stand’s two lower inner bolts (9th & 10th pics) with a 10mm socket and long extension bars, then I removed the two upper bolts (11th pic) with a 10mm open-end spanner.
Move the airbag actuator to the right, towards the front of car, this will just about allow you to get your hand in behind and turn then disconnect the white and yellow connectors (12th pic). This is done by pulling up the red locking clips on the connectors and using a small flat-head screwdriver to help release them before unplugging. Pull the small black plastic cable holder (with attached cables) away from the bulkhead stud (13th pic). This can be done by carefully prizing around it with a flat-head screwdriver. Slowly lift out the airbag actuator (manoeuvring it along the way) then seat it on top of the rubber seal which is up above the front fender panel (14th pic). The airbag actuator will still be attached to the car by a few cables which is ok. Look down into the opening and note the position of the BBUS connector plug as the sounder should be refitted the same way. It’s on the right hand side of it (15th pic) and is closest to the centre of the car. Remove the sounder from its bracket (2 x 8mm nuts which only need to be loosened) and lift it up then unplug it by inserting a small flathead screwdriver etc into its retaining clip (16th pic).
Remove any debris from the bottom of the bulkhead, located below the sounder bracket (17th pic). There was next to nothing in mine although there was some staining there which I couldn’t get rid of (nothing to be concerned about though). Push the connector plugs to one side then carefully pour some water from a small container (e.g. a clean jam jar or coffee mug) into the bottom of the bulkhead (avoid getting water on the connector plugs). This is to check that the water drains away from the car and onto the floor. The drain is a decent size and mine quickly drained the water away.
Look at the threaded positions of the two nuts on the old BBUS (16th pic) then remove them and refit into a similar position on the new sounder (this minimises the amount of turns needed to tighten it up when refitted onto its bracket, as it’s located in a confined space). Fit the connector plug onto the new sounder then position it onto the bulkhead bracket, ensuring the connector is on the right hand side of the sounder, closest to the centre of the car (15th pic). When tightening it, the nut nearest to the corner of the bulkhead is more difficult to access but a small 8mm spanner and a bit of patience will do it. The other nut is easy enough to tighten.
Carefully start lowering the airbag actuator back into position ensuring the cable for the BBUS is routed above the bottom of the actuator stand (9th pic) and not underneath it. On the way down, push the small black cable holder (with attached cables) onto the bulkhead stud (13th pic). Reconnect the yellow then white connectors and push their red locking clips down into place. Line up the actuator with the bolt holes at the top and bottom of it and start threading the two lower bolts on by hand (this is a bit tricky as there isn’t much space but it can be done) otherwise they could easily be cross-threaded, then insert the two bolts into the top of the actuator. Line the actuator up with the pencil marks you made against the top area where it is bolted to the bodywork (7th pic) as this should prevent any bonnet closing issues, then tighten the two upper and two lower bolts.
Refit the two small 8mm bolts on the ‘engine bay sound insulation outer dash panel’ then the coolant expansion tank bolt (5th pic). Refit the plastic windscreen cowl extension cover (3rd pic) and remove any tools etc that you have used from under the bonnet, then close it. If the bonnet fails to close properly e.g. one side of it hasn’t latched on, open the bonnet and on the same side slightly loosen the 4 bolts on the ‘bonnet secondary latch striker plate’ (18th pic) so that they are finger tight. Close the bonnet and the striker plate will move accordingly, allowing the bonnet to close properly. Open the bonnet and tighten the 4 bolts on the striker plate then close the bonnet.
Open the car boot and remove whatever you have used to stop the battery positive cable touching the battery terminal (I used a rubber flip-flop). Connect and tighten the battery positive cable, then do the same with the battery negative ground cable. Remove whatever you have used to stop the boot from closing (I used a piece of doubled-up carpet), refit the boot panels and close the boot by hand (it may not fully close until the engine is started).
Reset windows as follows:
Start the engine and close the window fully then release the window switch.
Lift the switch to the close position and hold for 2 seconds.
Repeat this process up to a total of 5 times.
Test the window to check that one-touch operation is working correctly. Repeat the process for the remaining window.
The time & date will need resetting on the touchscreen and the instrument panel display setting (operated from the steering wheel buttons) will need to be reset to your preference....I use the Jaguar logo.
I’ve tested the alarm system and new battery back-up security sounder (BBUS) which also included jacking the car up when it was double locked to check the tilt sensor (this is incorporated into the sounder). All is working perfectly and I’m now getting the single audible beep when double locking, no beeps when unlocking and the alarm is activated when the vehicle is double locked then jacked up. The car was previously giving no beep when double locking, two beeps (error tone) when unlocking, which indicates a fault with one of the security sensors (mine being the BBUS), and no alarm activation after the car was double locked then jacked up. This is explained in my previous topic.....’Alarm malfunction – No audible single beep when double locking’ https://www.ftypeforums.co.uk/viewtopic.php?f=21&t=6030
Plenty of patience is needed when doing the job but it’s very satisfying once completed. The total cost for a new sounder (part number C2D47174) which I purchased from my Jaguar main dealer was £124 and comes with a 2 year warranty. DIY labour charges were free!