Anyone fitted a new boot hatch seal?

Elibomrod

New member
Morning, still having issues with exhaust smell in cabin with windows open so it was suggested to fit a new boot seal. (Vacuum in cabin pulling in air from rear) anyway have bought a replacement

Anyone have any tips before I give it a go (well when the rain lets up!)

New seal has a cord to pull out as there seams to be a white soft putty like sealant deep within the groove.

This is underside of the old one
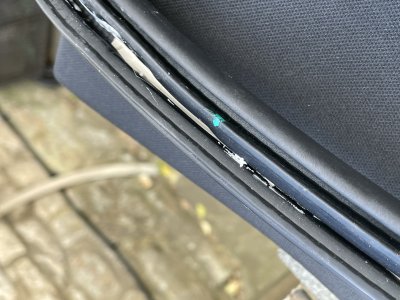
IMG_2348.jpeg

Will remove all traces of old sealant on body before fit.

Guess question is after lightly fitting seal all the way around, how hard do you push the seal down?

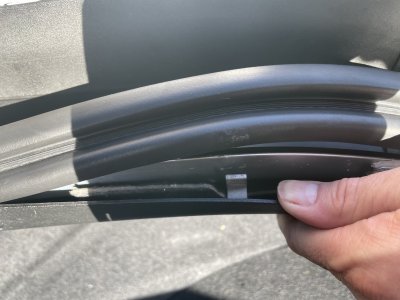
Also the existing seal doesn’t sit perfectly flush at two points near the bottom, see pic

IMG_2354.jpeg

Was wondering which side of the short length of ‘cardboard’ i the seal was supposed to go, mine is different on left and right sides. I’ve unhooked the metal tang to make more obvious…

Thanks
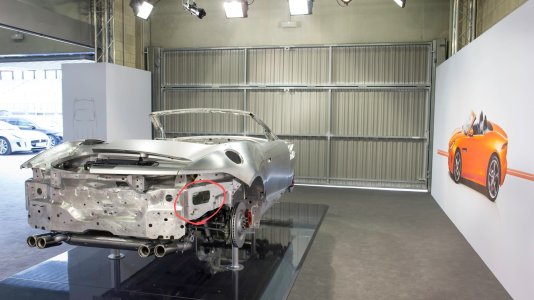
 
My first tip would be to mix up some washing up liquid in a spray bottle and then put the cabin blowers on full with everything closed and then go around spraying all the seals. If you have an air leak big enough to pull exhaust into the car then you will see/hear it from a mile off with that. Saves loading up the parts cannon and making rough guesses as to where its coming fro or creating actual leaks in the process of replacing everything. I'm pretty sure there are some flapper valves in the rear bumper to allow cabin pressure out when you have the blowers on and make the doors easier to close, if those have failed open then you have a hole right next to the exhaust. They go in the holes below AFAIK.2014-jaguar-f-type-engineering-displays_100425130~2.jpg
 
Interesting, took the trim out to look at those:

IMG_2355.jpeg

There is a little gap in the middle. Wondered if would close up with the lower pressure or whether this Is enough for my issue

Both sides very similar. Wonder if it’sa bumper off job to replace or a tricky wiggle from underneath. I might tape them over and see if the problem disappears.
 
You may be able to tie some string to them, and then pop them out from the inside, turn them 90° and then pull them back inside the cabin. That being said, I would be suprised if they don't fully close if you're getting vacuum inside the cabin. You could tape a go-pro or your phone in there and go for a drive to see.

If you're going to do the washing up liquid spray test it might be worth taping over them to pump up the pressure in the cabin. In terms of the boot seal it will be hard to test with the seal being tucked inside. Id masking tape over the boot joint and just leave a small gap that you can spray the stuff over to see if it's leaking. The boot seal is pretty basic though, I'd be suprised if it's that unless you have a big torn out area.
 
Elibomrod, how easy is it to get the trim out there, any tips please? I have a couple small patches of mould high up next to my parcel shelf on the left hand side (looking at the rear of the car in) my boot isn't wet or anything as far as I can tell or feel (no water in my boot well either by battery like others have had)

My car lives outside in all weather so wonder if like yours those vents are a little open, so moist air is just getting inside the car a bit as it sits for long times.
 
Think more likely that you have a slight leak been there before - turns out on mine jag forgot to fit a seal. Have a search for boot leaks

Tips remove parcel shelf battery cover and the bucket shaped well that goes where the spare wheel would have been

Then pull off the rear trim just behind the number plate sometimes easier to remove cable from the emergency boot release
The wire comes out by pressing out the little peg in the t shape glow in the dark part

Next two torx screws either side for the luggage loops.

Then there is some trim on either side just above the pivot for the parcel shelf its covered by leather and pulls directly out towards the centre of the boot. These are key to remove, just get your fingers in the gap and pull out, need reasonable amount of force

Once out you need to take the panel out on the floor just behind the spare wheel wheel you’ll need to remove the two tree style fixings and then lift the floor piece out

Then there are two more tree style fixings in the big side pieces remove those.

Next you have to lift the boot trim slightly up off the body either side just as i showed in the picture in this feed

There is a small steel hook that goes over the wing panel. Just unhook


The big sides then can come out. Slowly pull out from the back of the car leaving the front in place. You will have to pull past the foam at the very back

Once nearly pulled out remove the wiring from the interior lights

Then continue to pull each side piece from the back and eventually it will come out.
 
Back
Top