Coupe boot leak – easy fix

RPSN

New member
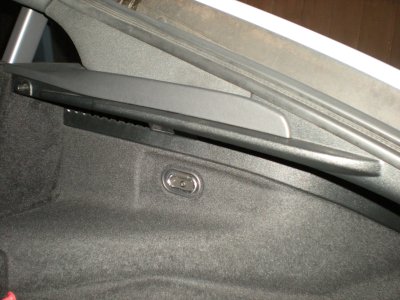
I recently noticed a water droplet very slowly dripping from the plastic vent on the driver’s side (UK) boot interior side panel. I checked the boot floor trim panels to see if they were dry and also removed the storage and battery covers to check for any water pooling on the boot floor. Luckily, everything was ok.

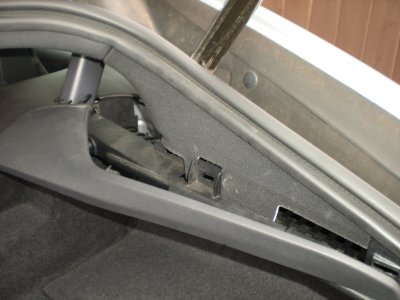
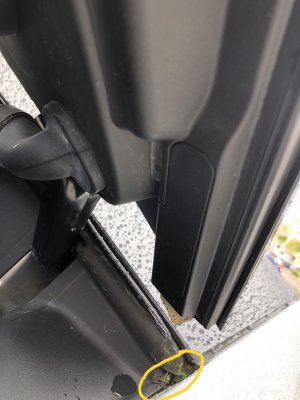
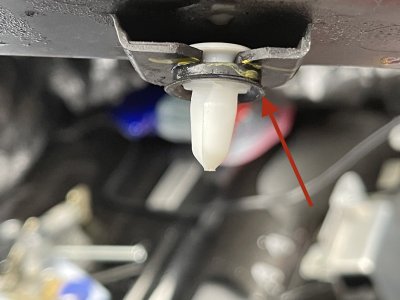
I fixed the leak by removing the parcel shelf and the small piece of trim alongside it (driver’s side) which pulls straight out. Then, through the gap in the ‘C’ pillar trim panel I could see the water leak was coming from the plastic stud/clip which is directly above the water droplet. I used some tissue paper to absorb any moisture on the stud/clip and liberally sealed on and around it with black CT1 Sealant & Construction Adhesive (works in wet or dry conditions – even under water). The fact that the sealant is black in colour doesn’t matter as its hidden when the trim is put back in place.

This saved me from the extra work involved in removing more trim from the boot (which I've previously done) as explained here...
https://www.ftypeforums.co.uk/viewtopic.php?p=49290#p49290
 

Attachments

  • 6.JPG
    6.JPG
    1.5 MB · Views: 2,885
  • 5.JPG
    5.JPG
    2 MB · Views: 2,885
  • 4.JPG
    4.JPG
    2.1 MB · Views: 2,885
  • 3.JPG
    3.JPG
    1.3 MB · Views: 2,885
  • 2.JPG
    2.JPG
    1.4 MB · Views: 2,885
  • 1.JPG
    1.JPG
    1.6 MB · Views: 2,885
This is a really useful contribution - many thanks.

I've been looking out for this problem, all was well until a couple of weeks ago I noticed there had been a few drips in this location on both sides.
I thought maybe it was caused by rain that was freezing and then thawing and forcing its way through somehow.
So this looks like an excellent preventative maintenance job.

I already have a tin of 'emergency roof repair' which is a black liquid rubber that solidifies quite quickly. Probably a similar thing as CT1 Sealant? Toolstation have it.
 
Cheers 👍

If your leak is coming from the stud/clip shown in my pics it’s an easy job. The stud is in the same location on both sides of the car and can be accessed the same way. The plastic vent near the stud on the left side is in a slightly different position to that on the right.

Toolstation sell CT1 Sealant in clear and various colours....https://www.toolstation.com/search?q=CT1
I’ve been using the black colour for quite a few years on numerous jobs on my cars and around the house and can highly recommend it.

Is this the tin of ‘emergency roof repair’ that you have?...https://www.toolstation.com/thompsons-emergency-roof-seal/p70897
If so, I’m not sure it would do such a good job as the CT1 Sealant?
 
Good write up. One thing though - should water be able to reach the topside of that clip? I can’t see a clip in that location with the boot open, so I’m assuming it shouldn’t even get wet at all. Is it coming in somewhere else, then dripping into the boot from the clip, if that makes sense?
I could be talking total rubbish, but don’t want you to find that you’ve diverted the leak to another part of the car.
 
👍

Yes, water can reach the top side of that clip which is why they have a seal on them. The reason you can’t see a clip in that location with the boot open is because it’s attached to the underside of the plastic and rubber drainage channel.

You're right in saying "Is it coming in somewhere else, then dripping into the boot from the clip". This is because water can get under the channel from a few locations such as the gap at both top corners near the roof, the cut out section where the tailgate struts are secured to the bodywork and other areas of the channel that are not sealed properly. However, the water should run past the clips and drain out through the area between the boot and rear bumper (in the same section as where the washer fluid reservoir is). Unfortunately some of the clips are not doing their job properly!

I’ve attached some pics from this forum which give a good visual explanation...
 

Attachments

  • 8.jpeg
    8.jpeg
    1.1 MB · Views: 2,107
  • 7.jpeg
    7.jpeg
    2.1 MB · Views: 2,107
  • 6.jpeg
    6.jpeg
    1.6 MB · Views: 2,107
  • 5.jpeg
    5.jpeg
    1.2 MB · Views: 2,107
  • 4.jpeg
    4.jpeg
    1.5 MB · Views: 2,107
  • 3.jpeg
    3.jpeg
    702.1 KB · Views: 2,107
  • 2.jpeg
    2.jpeg
    2.1 MB · Views: 2,107
  • 1.jpeg
    1.jpeg
    1.7 MB · Views: 2,107
Ahh, I see. That makes sense now.
The tape on the flexible plastic trim either side of the boot opening had already started to fail on mine, so I replaced that as it looked like an easy way for water to get in.
So by design, Jaguar expected some water to get in there, hence the seals on the clips. Good to know, otherwise you could spend an eternity trying to stop it getting to the clips in the first place and never win!
Thanks for taking the time to explain.
 
I knew this brilliant writeup would come in handy one day. :) I just discovered last week that I also have a bit of a leak after the car had to suffer through a few outdoor nights in torrential rain in the Alps. When I wash it there's just a very small amount of water entering and when driving in heavy rain hardly anything seems to leak in so it mainly seems to be an issue if the car stands in heavy rain for an extended period. That very rarely happens so it's fortunately not a high priority project

This is where the water drips in in my case - up front on the right hand side of the boot:

bootleak.jpg

Any good guesses on which of the clips is the issue here? My suspicion is that it's the one close to where the strut attaches to the body, so a bit higher up than the one you RPSN managed to access by just removing one trim piece.
 
You should be able to see a water droplet or water mark on the right hand side plastic boot vent as shown in my pics. You need to lean into the boot and look up to see it (a torch helps). The vent has two sets of slats (with the boot light in between them)...one set is towards the front of the car and the other towards the rear. If the leak is coming from the front set then it could be caused by the stud/clip further up than the one I accessed and you can just about see the area where that stud/clip fits into in one of the pics I attached earlier (red F-Type coupe). You can get at it by removing the C-Pillar trim panel. I posted the TOPIx C-Pillar trim panel removal and installation document here...https://www.ftypeforums.co.uk/viewtopic.php?p=80354#p80354

However, if the leak is coming from the rear set of slats then do the same as I did.

Here’s some further info on the C-Pillar trim panel and leaking studs/clips...https://www.ftypeforums.co.uk/viewtopic.php?p=80577#p80577
 
Thanks! My leak comes from the front slats so it looks like I'll have to strip out more of the boot to reach the offending clip.
 
Back
Top